Total Pageviews

Thursday 21 May 2015

Something old, Something New, Something Borrowed, Something Blue - Journal Heart 15 week 21

Hi guys!!

Welcome to Thursday and week 21!! This year is flying by!!

I have spent much of this week working on wedding commissions and plans (not mine!!!)
So this week's inspiration was staring me in the face 

SOMETHING OLD, SOMETHING NEW, 
SOMETHING BORROWED, SOMETHING BLUE


He he yup he is back lol, well this girl has to dream. Well the Old for this was the old book pages on the base...


Something New was the Visible Image Stamp set......which mirrored the stencil I used perfectly ( it was a happy accident as this page had been started months ago!

Something borrowed......well thats a bit tougher, the image is borrowed from the internet and I borrowed my neighbours printer as mine had yet another hissy fit!!


,,,,and the Something Blue....well I am sure you can see that for yourselves!! 

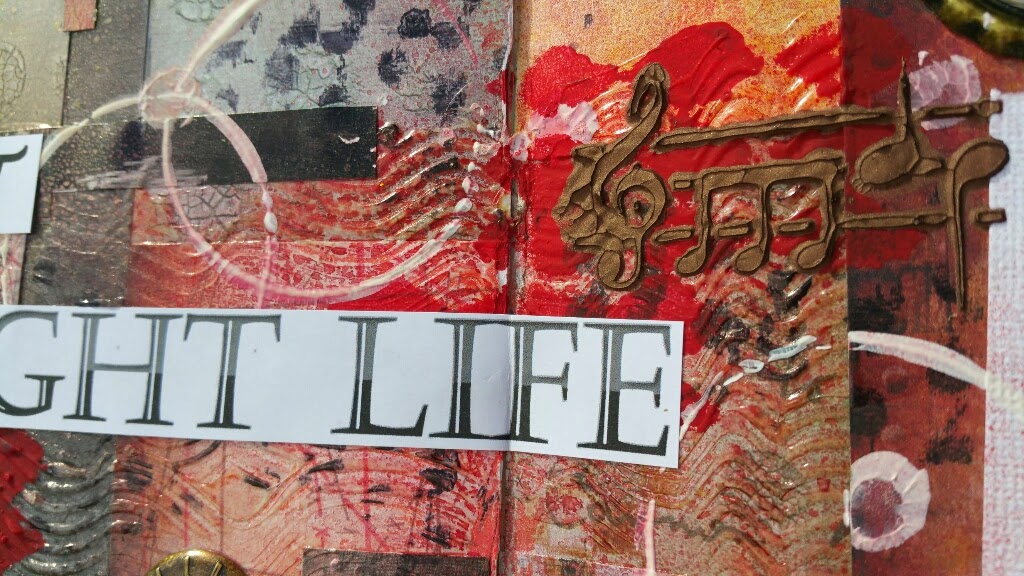
To "bed" the picture into the page I used lots of scraps of old diecuts and coloured them to fit - using the Crushed Olive as an accent colour has stopped the page getting too samey. Just be careful when you use accent colour that it stays that way and doesn't take over....hehe experience talking!!

Nothing goes to waste on my pages - even the babywipe I used to clean up has made it behind the photo and in the opp corner - carrying things thru from top to bottom/left to right/diagonanlly helps to keep your page balanced. I just tend to use a little bit of the layers/patterns/colours to keep the focus on the main image.


For this page I have used some "secret journalling" for my writing, I wrote my journalling out on a seperate page and then used a punch before adding them to my layout.
There are lots of times when you dont want your private thoughts on show so why not have a go at "hiding" them into your page.


So there it is - give it a go and try and use at least 2 of the prompts, if not them all......


Happy journallin' ;-)

Crafty Cheers for now

Love

Rae

xxx


Friday 15 May 2015

Doodletastic journalling - Journal Heart Week 20

Goodly morning Bloggers!!

Welcome to another Thursday ( thank the lord the its not a BH holiday this week - I have all the days in the right order!! )

So this week our journalling is back to doodling again......now dont all run off in horror!


Zentangle (or posh doodling!) is still a really popular and relaxing past time and anyone CAN do it. 
I always try to do 20mins a day normally 1st thing in the am / last thing at night as it helps clear my head for the day ahead / get my head into sleep zone which as an insomniac is vital!

Zentangle is simply about using repeating strokes to create patterns and images.... the image above is one I have drawn and then filled in but you could as easily use an open stamp ot stencil to practice.


Here is a close up of the detailing - this is NOT a process to be rushed. I like to work on full pages and do a bit each day and it can take a week or two to finish each page. A good tip is to make sure that your patterns always join with the lines around the edge. Gaps make your patterns look unfinished.

Now I DO NOT expect a full page BUT try drawing a 3in square on your page n fill that in and have fun...


Now the purists say.....black and white.... Well I break rules ooooh!! Arrest me :-P! 
Here are pages with added colour use specific pens (Micron etc) or use your biro/pencil. Those Memo blocks are REALLY handy - esp like me if you have spent the last millenium on the phone/on hold, it can be done any time. A habit I picked up from my Dad, who as well as being an all round medical guru was also an artist with several exhibitions to his name.


This page started off as just 7 circles doodled around a jar lid.....again add colour if you want BUT you can also add dimension with shading once your page is finished


The shading I have added with a soft pencil (2b) gives the layered effect on the circle....

So there it is pick up your pen/pencil/biro and add it to this week's page....

Happy Journalling

Crafty cheers for now

Love 

Rae

xxx

Thursday 7 May 2015

Rainbows.....Journal HeART week 19

Good moaning bloggers!!

Oh what a delightful few days of weather we have had 'up north this week!! NOT!!! 
However it has given me the inspiration for this week's prompt.....
that wonderful phenomenon RAINBOWS

As you may have realised by now any excuse for me to break out the colour pot and brighten the day....


So I used lots of translucent paints to create a base layer of red, yellow and orange (ok ok I did sneak a bit of pink in as it was left over from another project :-P) all applied with baby wipes until I was happy with the vibrancy. I love translucents as they add tone without making a page look "heavy" or dull.

Then I added a small amount of blue and electric green before adding the opaque pale violet through a prima stencil


I then took this fab stencil from Donna Downey and added a light whitewash and the indigo colour to make her stand off the page some more.


To finish I added the wording freehand using white detail to make it pop.

I was so happy with this page I decided to repeat it as an inspirational canvas for my new ETSY shop.....FaireFoxArt


So there it is take RAINBOWS as your inspiration, 
whether its using the colours as I did or the shapes as I have done in this earlier page....


Happy Journalling and see you all next week!!

Crafty Cheers for now

Love 

Rae

xxx


Thursday 30 April 2015

The Colour Purple - Journal HeART week 18

Hellllloooooooooooooooooooooooo!!

Welcome back to Journal Heart guys. Looks like the great blogger tech let me down scheduling the last two weeks so I have done this on the day!!


This week's page is all about your fave colours.....in my case Purples n Pink. Use your 2 favourite colours and black and white to create yourself a page of your own style. 


My page is made up of clean offs (brushes and baby wipes randomly swooshed over the page) and then stencilling on top. 

Nothing to complicated but fun bright and a happy page that is quick to produce when time has been in short supply recently

So off you go....look forward to seeing your creations!!

happy Journalling and Crafty Cheers for now!!

Love 

Rae

xxx


Sunday 12 April 2015

Life on a wire - Journal Heart Week 15

Good afternoon from a wild and windswept Cheshire!

Sorry this week is late, the BH sure got me all of a confused!!

So without further ado.....


This week is all about using new products. I know I have mentioned this before but anytime I get hold of new stuff I always christen them in a journal so I can get a feel for how they work and interact. 

This page started as a background of my new Dylusion paints. 
I got 6 of my fave colours to play with as I liked the look and potential. Though I have to stay hand on heart though the jury is still out in this craft lab - I love the colours but havent found a magic wow element yet. More playing will be needed...what a shame lol :-)

As is always the case I used new stencils to add layers. The trick with getting the layers to work seamlessly is too use the same colours as in your background..


So I took my largest design stencil and added orange dylusions spray and then my next two stencils were similar sized designs so I added the white gesso contrast and then the turquoise Dylusions Paint again through the new TH tyre tread stencil.

So have a go this week with any new stuff you have ( I am sure after Ally Pally some of you will have something!! ;-) ) and have a go at layering your stencils like here and see what you come up with!! 

Now I am off to do the next two weeks pages - praying they are going to schedule on here as I am off to Canada a week today for 5 days.....

Happy Journalling

Crafty Cheers for now

Love

Rae

xxx

Thursday 19 March 2015

Emotions and a look at alternate journals - journal Heart week 12

Hi Everyone!!!

I cannot believe how quick this year is flying by!! Spring is making a brief appearence this week - hope it lasts!

Now this week's journalling is very personal and I completely understand if you don't want to share lots of pages BUT for me my journal's are an important cathartic release from everyday stresses or more. I have never shared these pages before and won't again but I feel it is important you see this aspect of journalling. I urge everyone to try it at least once to see if you can capture a mood or rid yourself of ill feelings

I have a couple of journals specifically for this - I don't always want my very private feelings floating through my general journals. I want them in a seperate place - once I have put them to paper they are "out" and no longer drain me (if they are negative)

For some reason - and I can't explain why - I like to use alternative journals for this ...


....these are 2 of them. An old diary and a free book that held no interest for me.....


So I christened it with this page.......

These are very simple journal pages I use nothing but pens in them so that I can carry them anywhere, trains, coffee shops, tour buses, street cafes, the garden, the park etc and work easily.

When it comes to pens I have a wide range but I love my Posca Pens, my Sharpies which I carry everywhere and my pencils (H, B, 3B and 6B and my Spectrum Noir blendable pencils) for use at home


With these journals it is important to only do them for yourself - they are more like diaries than journals and often contain pages with a darker edge....


or a quote or lyric that captures a feeling or a moment...


All of my pages are freehand which I accept is not everyone's preferred skill but you could use your stamp collection as a starting point and then add your own doodles and marks and lettering (ooooo that dreaded word......!!!)


I love the way the words are still visible I think it adds for an interesting background so why not find yourself an old book and be brave......I do not use Gesso as a primer on any of these pages because I want the recycled look. If you are not feeling inspired emotionally why not skip through a page and look for a single word that may inspire you? If you look under the eye above you will see the page talks about crying.....in this case a happy accident BUT it could be an inspiration...

So happy journalling folks!!!

Feel free to share - you are amongst friends but if you want to do it as I normally do and keep it private go for it. See if it captures or releases a mood......

Crafty Cheers for now

Love

Rae

xxx


Thursday 12 March 2015

Collage pages.....Journal HeART 15 Week 11

Hi guys!! This week group member Tracy has taken the time to share a page about art collage. Tracy is an experienced journaller but dont be put off she has broken it all down to really manageable steps that we can all follow - so show your support and give it a whirl.....So over to Tracy....

This week is a very Teesha Moore inspired collage page.
(you can insert the final image if you want)

A key element in this style of journaling is collage. I prefer to use ‘download’ collage, which is available from various sources, and as the name suggests you download it for a small fee and can then print again and again.
I especially love the content on Mischief Circus and Teesha Moore collage sheets available on Etsy.
http://www.mischiefcircus.com/shop/


Ok lets get started. First of all add some colour to a page. Any acrylic paint is fine, apply it all over with a wet brush and immediately blot with kitchen roll. You just want the paint to be a thin covering and not have any grooves or paint brush marks in it as this will affect your pen work later. Also you don’t want the page to get too wet or it might wrinkle which again will not help later.

Here is an example of some pages I have prepared.


Then you can start collaging. The key here is to keep the collage dry – I stick all mine to the page using a tape runner pen. Be very careful with wet glue because any ‘seepage’ out the sides of the collage will act as a resist to your pen and pencil later.
Cut out interesting shapes and patterns to place around the border, with interesting pieces on the corners, and find a focal image for the centre of the page. You might want to use a different ‘body’ and a different ‘head’ and maybe put a funny hat on the character. Its not supposed to look ‘real’, its supposed to be a bit abstract and quirky.
Here is where I have got to so far with my page; I have mostly used Teesha Moore download collage images to create this page.


Next you want to add depth and dimension to the page. You could use various mediums to add shadow such as pan pastels and gelatos, but I usually use my Prismacolor colouring pencils. You can use a couple of colours but on this page I just stuck with one colour everywhere. Go darker with the colour in the crevices to create depth.


When you are happy with this first layer, think about adding paint pens and gel pens. In this page I have picked out the detail in the border and extended the flowers using a couple of colours. Think about a colour that you want to be the ‘value’ colour and emphasise that colour. Also evenly distribute your doodles – so if you have something in the bottom corner, put something in the top corner for example.


Build up these layers of doodling and colour – try using a white pen to add extra sketchy lines or dots, or use a black pen to outline things.


When you are happy you can then think about the writing. I always pencil where I want to do my writing before I commit with pen. I like using quotes on these pages.


Now I am happy with the pencil, I am putting in the writing using a black posca paint pen.


Finally, go back over your page. Add more shading, add more paint pen and gel pens, and as a final touch add a shadow line to your writing. Its subtle but adds a lot more depth.


Thank you so much Tracy for your really detailled guide to simplifying the collage technique! I hope this has inspired you all to give it a go. Have a look on you tube and pinterest at Art Collage/ Art Journal Collage and see what you can create!!

Happy Journalling and Crafty cheers for now

Love

Rae

xx
x


Thursday 5 March 2015

Photo it!! - Journal HeART 15 - Week 10

Howdy all!! Welcome to Thursday week 10!

Due to minor mishap on Tues I apologise for typo's and a slightly briefer write up than normal!!

This week's art journalling is all about including a photo in your page.....take inspiration from some scrap book layouts if you want! I love adding photos to my journal's it can make them much more personal and more diary like if you want it too.

The page I am sharing is one I started off at a Finnabair art journal class recently.....it starts off with paper peicing, although I chose to use the overlapping style I did with Hels Sheridan a couple of years ago


Simply cut up peices of patterned paper and cover your journal page - FANTASTIC way of using up scrap bits of paper. ( why not try just using peices of white from off cut cardmaking)  Then the Fun bit find yourself a Photo.....ANY photo - a selfie, a scenic shot, or...............;-)


I added some embellies to "bed the photo in and make it part of the page - something really important stops photo's "floating" in a page. Now you could go mad but beacuse this was in my mixed journal I kept it flat to avoid problems on other pages.

Then its time to add texture and more colour using 3d clear Gel / modelling paste / stamps / co-ordinating sprays and paints...


Its important not to put these add ons all over but group them - I did this by bringing the the gels across and down behind the photo....


I then printed off the lyrics in mixed fonts and added them to finish the page.

So thats the project and plan guys ...... go and give it a try - just remember add a photo. Even a mag clip if you are worried about using a precious photo...

Happy Journalling and thanks for your joining in.... 

Crafty cheers for now

Love

Rae

xxx

Thursday 26 February 2015

St David's day and spring is on its way.....Journal HeART 15 - Week 9

Good evening all.

Welcome to week 9 - this one is a nice easy one - a break from all the panic of the last few weeks :-)

Sunday sees the arrival of March and with it St David's day so take it as your inspiration and create a page with a spring like feel....

....for my page I used part of a Sheena flower stamp heat embossed for my take on daffodils before I coloured them and the background with Spectrum Aquas. The dragon is another from Sweet Poppy Stencils and was stencilied in black paint - the image is not entirely clean because of the page reacting to water but I like it that way.

The quotes are all from Dylan Thomas - one of my favourite poets.

So there you have it - let's see what we can come up with this week! If you want you can use one of the quotes as your page theme or a quote from any of your favourite welsh character......what's occurrin'.......

Happy art journalling - crafty cheers for now

Love

Rae

xxx 

Friday 20 February 2015

Chinese New Year - Journal HeART 15 Week 8

Well Hi there gang!! 

Welcome to the weekend and welcome to week 8 of Journal HeART.
This week it is all about the Chinese New Year which was celebrated yesterday....


This year is the year of the goat/sheep - one of the most prized creatures in the Chinese Zodiac and the year 2015 focuses on green sheep!!

This gave me my colour scheme along with the fact that the goat/sheep is the last of the fire signs and the cross over year between fire/metal hence the gold numbers and symbol.

One thing I often do is write on a blank page all my research notes and ideas and feelings before I work over them - its a form of "secret" journalling. 

  
You can see it in this page as I chose to use transclucent acrylic paint for the bulk of my background after I had stenciled opaque paint. I used Fresco paints from PaperArtsy for this project (available here
I love the effect of the scribble underneath but not being able to read it clearly...

I then took some of my fave chinese stamps from Oak House Studio - Lynnda has some aweome oriental stamps and they are even in the sale just now so quick!! Get them here.....and add more layering detail - the trick to not making it too chaotic is to keep your colours in the same family - it builds subtle layers 


When it is all put together with some stencils from Splodgeaway it looks something like this...


It's a positve time of the year and its all about carving out and creating your future and fortune so my new Finnabair stamps and their sentiments fitted perfectly. I added the goat like (ok with the eye of faith lol) symbols to finish

So this week research a bit more about the chinese new year and use that as your inspiration

Crafty cheers for now and Happy Journalling

Love

Rae

xxx


Sunday 15 February 2015

Getting Washi with it.....Journal HeART 15 week 7

Hello and evening all!!!

Apologies this week's post is late but better late than never eh!!

As you have probably noticed I use lots of Washi tape on my pages and although it is a beautiful addition it can be an expensive addition....or not....

It can be used for tonnes of things not just our art journals.....check this out for just some crafty ideas with tape

Traditionally Washi Tape is typically made from natural fibers, such as bamboo or hemp, but most commonly from the bark of trees that are native to Japan — the mulberry, the mitsumata shrub or the gampi tree....but as I say it can be pricey so today I want you to have a crack at making your own


I tend to make it as I go but you could premake some and store it on greaseproof papers.

What I did this week was make a masterboard of home made washi tapes...


Masterboard to me is just an A4 sheet full of designs which I can chop up and use in lots of diff projects. Always handy to have around for last minute cards of a quick canvas.

So to make my own Washi on this one I used Acrylic paints and Archival ink with stencils and stamps on different widths of cheap masking tapes. In this project I kept them neat but you could tear into lots of strips and go crazy in all diff directions :-)

You can use dimensional pastes through stencils too,  if you want but keep them fairly lightweight. I also laid scotch tape across old bookpages which neatly lifts the print - so simple but so cool.

Why not try dusting off your gelli plate too.....check this out :-)

If you want you can keep it simple and dig out your journalling pens and just doodle on to some scotch/masking tape....it really is easy and so much fun!!

Once all my tapes were paid down I added some additional stencil layers and then I got chopping up......


to create my finished page.

So this week have a toots around the internet and create yourself some Washi lurve :-) You can always add to some Washi tape in your stash to for a bit of variety.

It's a great way to customise for a specific project! 

Crafty cheer for now and happy journalling!!

love

Rae

xxx


Thursday 5 February 2015

No paintbrush - No Problem1! Journal HeART week 6!

Gosh these Thursday's come @ quick lol!!

Anyway howdo all and welcome to week 6!

So this week we are straight into it......this weeks challenge is to create an art journal page without picking up a paintbrush!!!


I frequently start pages off with paint/ink/gesso etc from other projects to avoid waste. That includes wiping off brushes, scraping off palette knives or as with this page - smearing baby wipes! 


.....this one was just a baby wipe wiped all over the layout in a very loose circular motion after cleaning, then stencils and punchinella that I had inked through were cleaned off on the page with more wipes. The edges are all second generation stamp offs before I scraped heavy gesso through a stencil and used an alcohol marker to hightlight. The song lyrics were stamped and a mix of washi tapes finished it off!! Now some may say the lyrics are "dark" but thats what journal's and art diaries are for.....capturing a mood or a feeling (they are part of the lyrics to one of my fave Kaiserchiefs tracks n btw the next line is "before I see the Light") - and it's balanced by the bright colours I used on the page

No one is always on a high or always on a low......I find it very cathartic to get rid of negative thoughts on a page

Now this one is totes different......this one is from my art sketchbook...


...still no paintbrush. The inspiration for this was my upcoming trip to Hawaii.

I applied Silk acrylics to my page in the four basic colours - pink, purple, green and turquoise using my finger and a baby wipe. (Really helps that they are trancluscent so blend great with the moisture from the wipe) before adding basic detail with white gesso on the edge of an acrylic block and then fine detail with a pin...Yes a PIN!!! It's a great tool to either add or scratch detail into a page.

So that's it, off you go!! 
Get creative - lets see who can use the most unusual thing to create a page this week ...(oh oh STEADY ;-) !!)

Have fun guys - look forward to your creations!!

Happy Journalling!!

Crafty cheers for now

Love

Rae 

xxx